“Hello World!” on Unity

Since we were about to use Unity to create a game, I decided it’d be the best platform to try to code “Hello World!” into another coding language (since we were taught to do it on Flash at college). I downloaded Unity and had never seen it before, so it took a while to find the right way to code this in, but now I have I see that it was actually quite simple.

To do a debug script on Unity you had to add  Debug.Log(“Hello World!”); into the existing code in the new C# script I made.

hello-world-code

Once I’d done that I dragged the script over the ‘main camera’ asset and clicked play, so the message popped up in the corner.

hello-world

It took a long time to get right, but once I found this method it was really simple and had no compile errors like other times I’d tried.

UV Unwrapping for the first time

At the start of the lesson I had an understanding of why UV Unwrapping is done and what it does, but I couldn’t do it. I once attempted to colour in a model with 3D colour, just to see my model in colour, but I never textured it. Today I learnt how to unwrap my model.

To UV unwrap I had to take sections of my model at a time in easy polygons to wrap back up. This meant splitting some objects into top and bottom pieces, like the main body of the ship, so that each side would have a flat side to colour and be put back together later as if I tried to do complicated shapes the UVs would be messy.

When I had the UV Editor open at first all of my mesh was in one space, so on my 3D model I had to select the ‘face’ option and mass select sections of the model then hit shift+right mouse button on the part of the UV highlighted in correlation to my section, then click planar map. Once it opened the selected section into a planar map I would right click on it to select ‘UV’, then I’d highlight the section on the map and click ‘Smooth UV Tool’, which meant I could unfold it into a flat polygon. I did this to every section of my model  on my UV map.

The next step I need to do is to scale them all on the map and apply the chequered lambert and make sure it’s similar on every section. I would also need to stitch some edges together where some shapes meet. They all need to be to scale in the top right corner of the map, also.

It took a while to figure out what to do just for what I’ve done now, but I think I understand what I need to do next, now.

Drawing Faces

Tony taught us the framework for drawing faces and I’ve been practising it at home.  I have always liked drawing faces but had never been good at mapping things out first, but this technique really helps make sure all of the faces I do are well proportioned and it’s especially helpful when drawing multiple pictures of one person/character to keep them similar.
framework
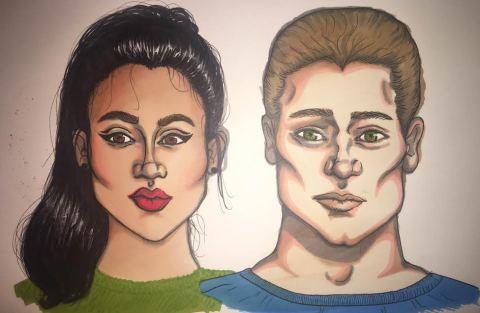
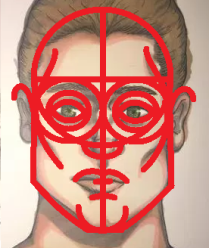
I’ve been trying to incorporate it into my faces now, and it helps me stop the faces becoming really wonky. Its fun to experiment with and come up with totally different looks.
On the left is a quick picture I did over my drawing of the outlines we use as the base of the face.faces
On these drawings I actually started out with the framework for the first face I did (the man) just to draw dark grey contours to try and map out a face in shadows, but then I decided to colour the whole thing in Promarkers. When I’d done that I detailed it with pen. I then decided to try and do a female face too, but with her I didn’t use as much of the framework (the cheekbones and forehead) because I didn’t want to sculpt her structure as much, so she had softer features. They look like different styles due to how I started the first drawing but the face on the right looks more symmetrical.

2nd 3D ship

For my second ship on Maya I began with a cube and extruded outwards 2 more polygons which were to be the ship’s wings. I used the scale tools and added in edge loops where I needed them to create a diagonal wing shape on both sides. At the end of each wing I extruded the ends again then pulled the corners into the original wing to create triangular boxes. On those boxes I placed a cone each (to represent a very basic laser gun).

laser-gun   top-of-ship

I shaped the base box around the back and had the wings further forward than the front of the ship centre by using the scale and move tools until I had a shape I was happy with. I tried to make the wings streamlined, and a bit more stylised, than my last ship.

On top of my ship I made an engine by using the scale and move tools on certain faces of a cylinder polygon. I just played with the shape of the engine until I could place it on top of the ship and be happy with it.

engine.png

Beneath the ship I flattened and curved a cylinder again to create a circular pod. It should seem detachable from the main ship, complete with two smaller engines beneath it. These engines were made the same way I did the engine on my first ship, by extruding a cylinder, then extruding a circular internal shape internally to create a hole.

new-ship

Peer assessments were helpful; I was told my wings were streamlined, but that i should edit the placement of them and the shape of the body of the ship to allow the entire vehicle to be streamlined, and that the engines were well made-but the pod should be attached with visible attachments to the main body. I will use this to improve my ship.


Maze Game

I edited a basic maze game to make it more personal and in places possibly more difficult.

I started with plain maps with white mazes and red and blue blocks for the character and goal. At first I edited the background to make it into an image of grass, which was multi-tonal and  made the map look more complex when I changed the actual maze colour.

For the maze itself I went to the properties> fill and stroke and made the colour green with a white outline. Then I went to properties> colour effect> style> alpha and changed it to around 20-30% so the maze was partially transparent on a grassy background, just to make the game look a bit harder to do on every level.

I changed my character by wiping the original square and drawing in a basic yellow and blue butterfly. Then I did an animation on the wings (with assistance) so they flapped as the butterfly flew through the garden maze. I also wiped the square from the goal and made it into a blue flower so it fit the theme.

I didn’t add many new obstacles but I added a few blocks into level 2 and level 4 to match the maze theme. On level 5 there is a spinning block which I edited from an opaque white block into a translucent curved green obstacle. It still spins but will catch the player out slightly differently.

On the last page once you complete the game you’re greeted with a red ‘Retry’ button. I used a photo from Google to experiment with inputting images as a button.

When I went from using a Mac to alter my game back to the Next Gen rooms my game had a glitch and I had to fix the code, so I copied each slide of my game onto a new Mazegame214 file and had 2 separate copies for different Flash types.

Overall I think I could have changed more of the game, like adding in a level, once i really had a hang of using Flash, but it took me a while to grasp the basics. I understand what I’ve done so far and am hopeful about improving my Flash skills.

(I’ll add screenshots of the process when I can next access my game)


My Powerpoint

presentation1

This presentation was about where Sonic came from and how he is Sega’s mascot. There’s not much text on the PowerPoint as the focus was on photos as I spoke about the meaning of each slide. I talked about Sonics design inspiration, technological advancements, competition to the old mascot (Alex Kidd), the history behind Sonic and behind Nintendo- dating back to Popeye in the 20’s, and finally about where Sonic is now and where he is in reference Sega’s original rival, Nintendo, now.

I could have talked slower and in less of a general tone. If I cut out more of the slides I could have expressed more information on focussed sections. I also need to only speak positively about a company.

Apparently I projected my voice and had researched into the company’s history well. I enjoyed talking about the character design and the deep history behind the sequences of events that led to Sonic coming about, and how the rivalry became collaboration with Nintendo over time, building each other up as enemies and as friends to create similar but also original games.


Creating a 3D ship

Today I tried 3D modelling for the first time using the software Maya. I had never used any software like this before, so it took a while to get to grips with some of the basic tools.

Firstly I used the cube polygon to begin shaping my ship. I moved some vertices together to create a triangular pyramid shape for a streamlined look, then I used a sphere to create a pod in the ship; I did this by distorting the sphere to make it longer and by moving it so only a semi-sphere appeared above the original ship. For the bay I selected a section of the sphere’s faces to extrude inwards.

For the engines I used a cylinder polygon, then extruded it to extend the length. Afterwards I selected a smaller circular section on the face to extrude into the cylinder to create a tube appearance. As I wanted two engines I selected the original engine and duplicated it then attached both of them to the bottom of the ship.

As I felt my ship needed another asset I used the ring polygon to create  an outer rim which could attach to the ship.

I found Maya difficult originally but I have begun to understand the tools and options I can use to create models from simple to complex once I get practised, and I will continue to work hard to improve my Maya work.

ship

Introduction

the-incredibles

I’m Eve and this is my Next Gen reflective blog. Here I will be storing work I do based on everything I am taught.

I took the course because since I was 9 years old all I’ve wanted to do is design for, and animate, movies and games. My goal started after watching the production process for the movie ‘The Incredibles’ many times, trying to recreate everything the design team did myself. Ever since I’ve wanted to know how something such as that is made.

This course will teach me a lot about the field of work I would love to go into, such as concept art, VFX, 3D, animation, games design, programming, and industry. Hopefully at the end of it I’ll be a lot closer to being able to create the type of content I personally enjoy.